

GameArt Spotlight #49
"Slash" by Subi

Image details
- Title: Slash
- Gallery ID: 00821
- Artist name: Subi
- Posting date: 2000-02-06 (a Sunday)
- Artist website: http://www.gameart.com/4ca
- Tags: quake3arena, quake, 3, arena, models, anime, manga, drawings, comics, japanese, women, girls, sexy
- Image size: 50.71 KB
- Votes: 35
Please be sure to read the Copyright & Legal information text on the About & Help page.
Spotlight article
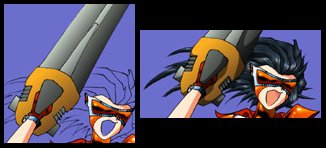
Okay, I fancied doing something a bit different. Rather than drawing yet another character from a Japanese game or anime, I decided to do a Japanese take on Quake 3 Arena (no, not Shogo ;). If you've flipped through the various player models and 'bots, then you might've noticed a character called Slash, with a skin called Yuriko. I don't know if you're familiar with Sailor Moon, but my impression of the Yuriko skin was that it was exactly what Sailor Mars would look like if she did a few amphetamines, ran her hair though some engine oil, ripped the middle out of her fuku and REALLY lost her temper...
So, that decided, I sat down with Q3A, started following the Slash 'bot about and taking screenshots. Once I had enough (and after being fragged about 19847501328 times) I stuck Dom & Roland's "Industry" (Moving Shadow ASHADOW16) in the CD player and sketched a rough figure in 2B pencil on an A4 piece of cartridge paper. 135 GSM if I recall, pretty cheap stuff. If I'm stuck for a pose to draw I'll often leaf though some of those ludicrous "style" magazines to get a few ideas - this one came from an article in an old copy of i-D, how appropriate is that? ;) Using the screenshots as reference I filled in all the details on my rough figure and inked it using a 0.1 mm drawing pen.
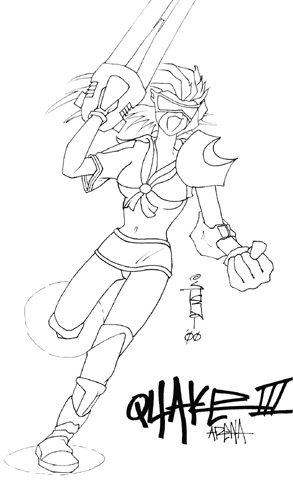
Quite often I won't actually bother inking a picture before scanning it (I hate inking, there's too much chance of screwing things up and I'm bad at it) but I wanted a "cel" look to this one, so I gritted my teeth, crossed my fingers and did it. Lastly the Q3A logo was just a quick graffiti scrawl with a black marker. The picture was scanned as a B&W photo rather than as Line Art, to get some anti-aliasing on the lines, at 200%, to make the lines relatively thick which makes filling in easier. Note to all accusing me of being ecchi: The original skin has her flashing her panties, so don't blame me. ;)
In PhotoShop 4.0, after the inevitable half-hour spent tiding the picture up with the eraser (must get round to cleaning that scanner one of these days) I switched the picture to RGB colour mode and turned it into a line art mask. Many people just change the line art layer to Multiply to do this, but this doesn't give you much flexibility, so I use a proper mask. To do this you invert the line art, cut it, make a new layer with a layer mask attached, paste the line art onto the mask (select the mask using ALT and LMB) and fill the layer with the colour you want the line art in.
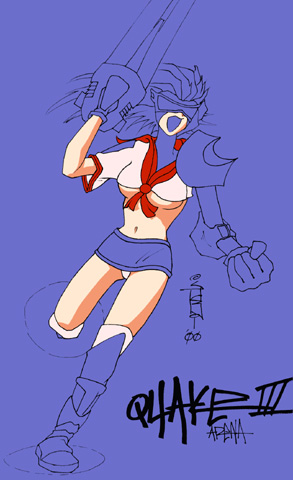
Next I filled in all the flat colour areas, mostly her skin and T-shirt (and the... er... panties). You may notice the picture now has a blue background (on the Background layer PhotoShop gives you below everything - I always keep this layer separate as you can't do all the functions of a normal later with it). This is to make the light colours more visible whilst painting with them. I'll tell you how I do shading later, but I'll just mention now that the method I use for works well on everything - except skin (comes out too grey), so I tend to shade skin when I do the colours.
Colours are done using the standard Paintbrush on a new layer below the line art. If a coloured area directly connects to an area already coloured (like the shading on the skin) the new area is filled in on a new layer below the one with the colours on and then the two layers are merged together. Virtually all the operations described in this article are performed on new layers like this, bear that in mind. Layers rock. So we end up with one layer with all the colours on it just below the line art.
Now I don't know if it's just the Gouraud shading in Q3A, but most of Slash's clothes are fairly shiny. I could just use highlights, but they wouldn't look very "cel". So I dug out a few Dirty Pair comics and took a look at how Adam Warren draws Kei and Yuri's metal bikinis. Come to think of it, doesn't Slash's skirt look like Lum's? ;) Manga art tends to use a lot of screen tone (also called "zip") the effect of which is easily simulated in PhotoShop using the Gradient Fill tool. Just as well, as it's virtually impossible to buy the stuff here in the UK.
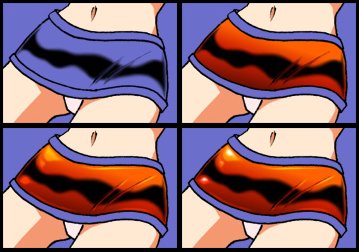
So, after another hour or so spent re-reading "Sim Hell" for the Nth time I (deep breath) drew a thick swirly black line with the Paintbrush and smudged it with the Smudge and Blur tools , used Gradient Fill to go from a dark red to a bright orange , added some highlights using white on a layer above set to Overlay and finally added a few more on top of those using white on a layer set to 50% transparency . After doing the same to all the required areas, and using the same techniques with different colours for the gradient fills on the other areas, we get. And YES mister eagle-eyes, I DID miss out her forehead when I did the skin earlier, alright? :P
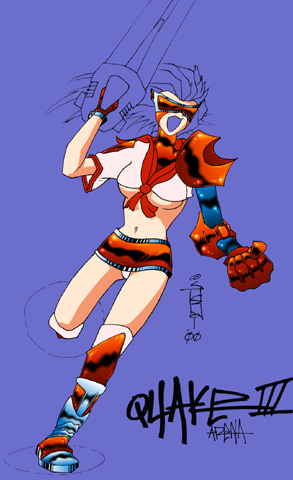
The metal bits took FAR too long (about three hours total) and about half a pack of cigarettes. Getting round to the boring old machine gun was something of a relief. Time for the rest of the shading, which is just black on a 50% transparent layer above the colours. Simple, yeah? Hardest bit is remembering where you're imagining the light source is...
Hair can be fiddly, and can really screw up a pictures colour scheme, so I tend to leave it until last. I've got two ways of colouring hair in an anime style, one for dark and one for light. The dark hair technique goes like this: First all of it is filled with the dark base colour (a blue-grey in this case), then the streaking is added by using white on an Overlay layer. Yes, Overlay also rocks. ;) I draw a white band across each strand of hair and then use Smudge along the strand to stretch bits of the white line out to make the lighter lines. Finally the highlights are added using white on a 50% transparent layer, as before. The shadow of the machine gun was done using the same shading method as the rest of the figure, black on a 50% transparent layer.
Okay, figure coloured in, but looks dull. Exciting background time. This was made by using a layer filled with B&W cloud (using the Clouds filter) set to Overlay (yes, again) over a layer filled with a blue to black gradient. The "speed lines" effect was made by setting the Fill tool tolerance very low (2 in this case), clicking randomly a few times on the cloud layer (which gives a very weird "fractal" effect) and then using the Radial Blur Zoom filter. Radial Zooms can be a real pain, as the original size of this picture was 1058x1753, which meant each one took about ten minutes on my P2 266 64MB machine. Seriously. I like the effect though, but I usually keep a decent book near the PC for those "please wait" moments. Particularly as this frequently crashes the machine if it runs out of swap space.
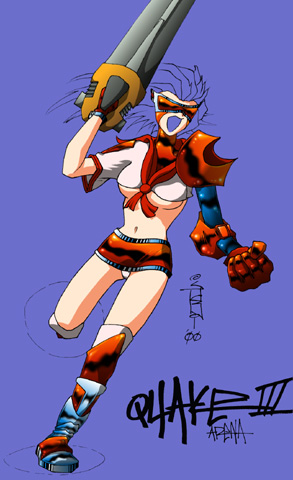
The jets on her feet are just blurred white circles, set to overlay and duplicated 4 times (hey, jets are kind of intense). The "Quad Damage" glow involves Selecting All on the colours layer (using CTRL and LMB), expanding the selected area, filling the selected area with a light blue on a new layer set to Overlay underneath the colours layer, Radial Blur Zooming that layer using the same origin point as for the clouds, and then duplicating it (to get a more pronounced glow effect). The Q3A logo was made in a similar way, but not blurred, and the line art for it was separated to a layer of its own, filled with white instead of black like the rest of the line art and set to Overlay (what a surprise). Finally finished.
Total time: about five or six hours. Kit used: pencil, pen & paper, PhotoShop 4.0, P2 266 and pan - er - scanner. No I don't have a Wacom tablet, and next time I really WILL clean that mouse... ;)
Text written by Subi for GameArt.com