

GameArt Spotlight #54
"First Prize" by Peter Villumsen

Image details
- Title: First Prize
- Gallery ID: 00847
- Artist name: Peter Villumsen
- Posting date: 2000-03-06 (a Monday)
- Artist website: http://www.danbbs.dk/~pvillum
- Tags: quake3, arena, quake, 3, arena, quake3:arena, painted, strong, muscles
- Image size: 57.17 KB
- Votes: 23
Please be sure to read the Copyright & Legal information text on the About & Help page.
Spotlight article
Hi, and welcome. In this feature I'll try to guide you through some of the steps that I went through when I did the Quake 3:Arena inspired painting First Prize. Firstly I'll start off by mentioning that I didn't plan writing any feature while working on the picture, which is why some of the steps may seem a little jumpy. This is my first time writing a tutorial, but I think it should be quite easy to follow if you got good basic understanding on Photoshop. It was done in PhotoShop 5.5 in high res. 2480*3425 with a Wacom tablet.
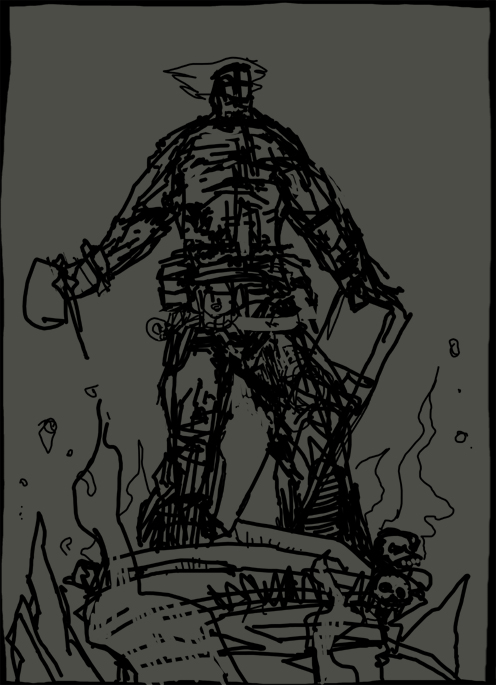
I never just start painting away. I like to have a sketch to work from. But as you can see it can be very loose. Usually I do the sketching on paper, but it happens that I do it in Photoshop. As soon as I'm happy with the sketch I add a new layer underneath and fill it with a general color. It really doesn't matter what color, just something to eliminate the white background. Here I chose a color that I planned to work from in the background sky. The sketch on the layer above is set to Multiply.

As you can see I started painting the background. I added a new layer for this just above the background color. I use fairly big brushes around size 30-100 and the opacity option set at 80% with pressure enabled. Just painting a subtle gradient with some cloudlike formations in it. At this point, and the next few steps, it's very important not to get carried away with detailing, since the colors will be enhanced anyway later on.

Going from the background to foreground. The foreground is painted above the sketch layer. It's still important not to get (too) carried away with detail. it's also very important is it to get the lighsources right. The more you get it right at this stage the less you correction you have to do later on. I have bloked in the general colors for the foreground and character and put some detailing in. Mostly in the guys's upper body. A great trick is not to do the same degree of detail throughout the whole picture, but to leave some areas quite sketchy. This will help to guide the viewers attention to where you want it. Another thing I like to do is to let some of the foreground 'fade' into the background like you can see I've already planned on doing with the character's left leg.
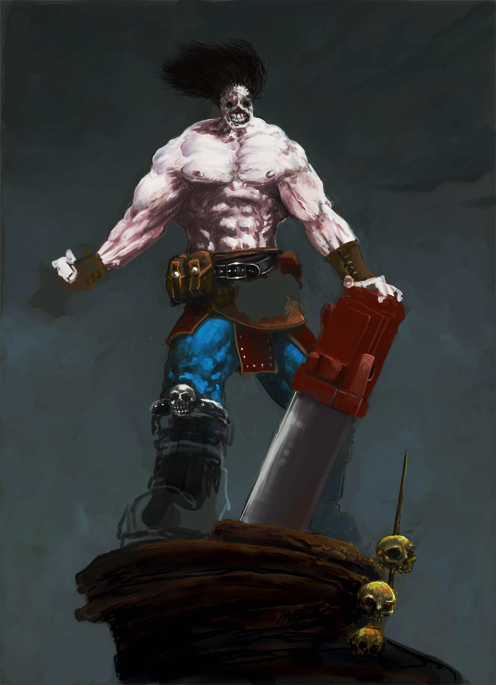
The fun part! This is where I really play around. :^) The sketch layer is dicarded (or hidden) and two adjustment layers are applied. First I apply a curves layer and above that a hue/saturation layer. I like to apply curves and H/S as layers because this let me alter them later on if I have the need to do so. Applying curves will result in enhanceing light and shadow. As you can see some unwanted detail will emerge especially in the the background. Therefore it's very important to work over these areas again. I apply the hue/saturation adjustment layer because I find that working with transparent brushes will ofthen result in the colors being a little too pale/desaturated.
On top of the adjustment layers I start defining the light source a little better. To have your light sources correctly defined is a key point in doing great images. I usually only have one main light and try to add some feeling of radiosity (the effect simulating light bouncing from object to object). lastly I'll add a effect backlight that adds well to the 3D feeling of the painted objects. Note the attention to the rocketlauncher, clothing and the the guy's right boot. I also put in a subtle reflection of the rock in the suface of the rocketlauncher. Such detail helps pulling the image together.
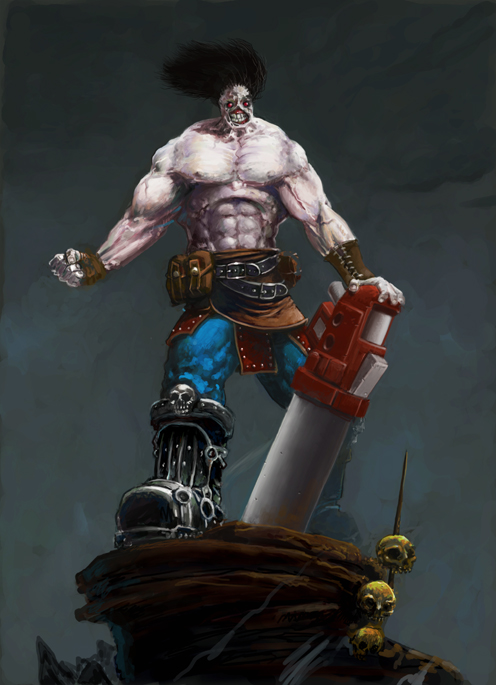
Adding the foreground and background smoke. Just to add atmosphere. Painting loosly on a new layer with a transparent brush and afterwards erasing where I want the rocks and skulls to be more visible. Start of with a bigger brush and add details lastly with a small brush. I also changed the clothing a bit. Suited him better with a couple of rocketlauncer grenades instead of a big Batman-Utility-Belt ;-)

The chain with the Q3:A logo was in fact not planned in the first place (as you can see in the sketch). I just wanted a cool way to incorporate the logo in the painting and came up with this. It was done on a seperate layer. No fancy technique, just painting in the general shape of each link of the chain. Working from bright to dark and keeping track of where the light hits.

Backlighting is added. Here it is also just as important as before to figure out how the light hits the objects. And don't overdo it! It was done on another seperate layer set to normal and painted with a paintbrush, opacity at 85% with size and pressure checked.
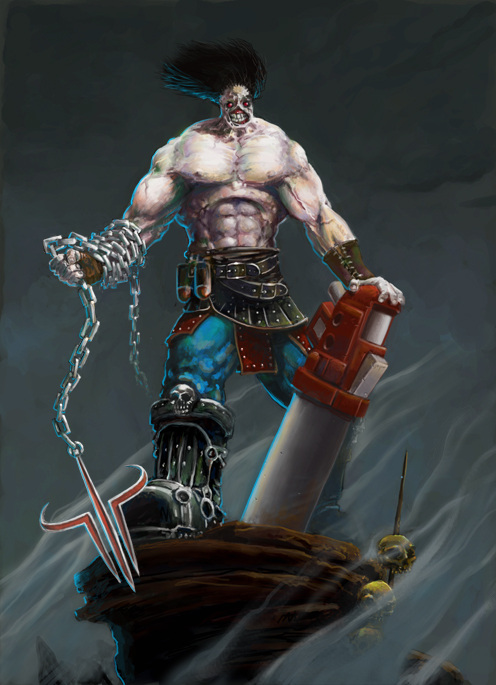
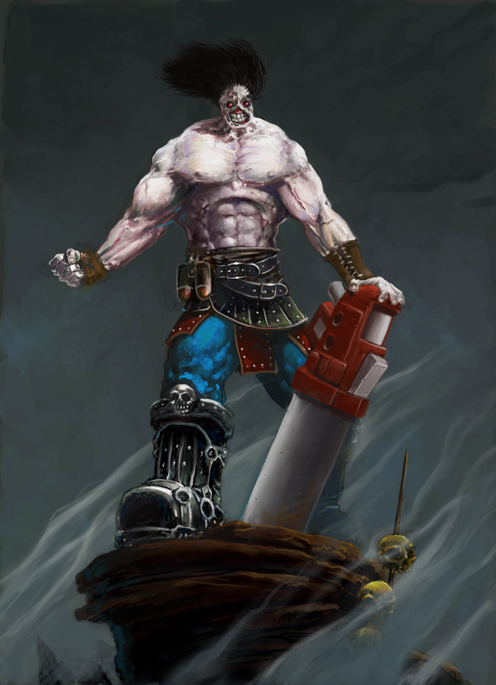
One of the last things I do is to add a new layer (normal, at approx. 30% opacity) . In this layer I put down colors that describe value changes when light areas goes to dark and viecversa. Light areas will have warmer colors surrounding them and darker areas colder colors. This gives the painting a more lifely feel to it, I think. we're almost done now (hang in there!) we just need to do the.....
Dogdeing... Yep I use it. Though not always and when i use it I use it to subtle things. In this particular painting I used it on the rocketlauncher, the chain and the boot. I also used it on the rest of the mainfigure but very very spartaniously. I still wanted it to look like it was done in traditional media and then you can't go berserk with the dodge tool. As you can see I also smoothed out the background a little and to finish it off I applied a noise filter, (gaussian at 10) just to tie the image even better together. Thats it! Finito! Have a nice weekend...
I hope this feature can bring some light how I did this paintng, and even inspire some to do more traditional looking paintings in Photoshop. Lastly I would like to thank my mom for being there and ID for bringing us the most Kick-Ass-Game of last year. And you for reading all this crap ;-)
Text written by Peter Villumsen for GameArt.com