

GameArt Spotlight #69
"Psycho Mantis" by Jacob ''Carp'' Paul

Image details
- Title: Psycho Mantis
- Gallery ID: 00962
- Artist name: Jacob ''Carp'' Paul
- Posting date: 2000-07-28 (a Friday)
- Artist website: http://www.geocities.com/Tokyo/Flats/1498/snatcher.html
- Tags: Metal, Gear, Solid, comics, reactors, drawings, masks, radiation, nuclear
- Image size: 43.56 KB
- Votes: 21
Please be sure to read the Copyright & Legal information text on the About & Help page.
Spotlight article
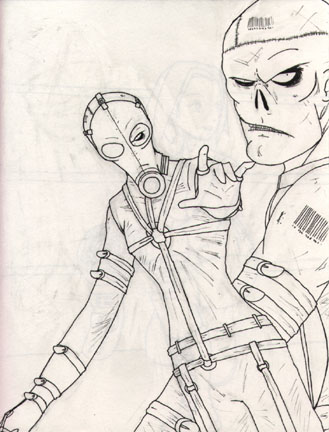
Hey, everybody. My name is Jacob 'Carp' Paul, and I'll be your party host for this edition of the spotlight. I've been drawing ever since I can remember, and playing video games for nearly as long, so it's really cool that I've been given to opportunity to do this. Since I'm a sucker for Konami's masterpiece Metal Gear Solid, I decided to put together this piece in honor of one of my favorite characters from that title, Psycho Mantis. Now I'm not exactly a professional; I still have a lot to learn, so not all of my methods are perfect. Nevertheless, I'll try my best.
When I first drew this picture, I used the MacFarlane Toys' Psycho Mantis action figure and the original MGS artwork for reference, so I wouldn't forget any important details. After trying several different poses and sketches, I finally settled on one I particularly liked. I then inked the picture using several different technical pens, and erased as many pencil marks as possible. Once that was completed, it's off to Adobe Photoshop I go.
Using my UMAX scanner, I scanned the image at 150% of it's original size, and only at a measly 72 DPI. How dare I. Yes, I know a higher resolution would have been a better choice, but since I'm working with *ahem* less that optimum equipment right now, that's about all my computer can really handle.
After the image is scanned, I save it as a PSD file. After scanning the image, I need to clean it up a bit. I use the magic wand tool to select and clear all the large blank portions of the image, removing all the pencil and eraser marks I may have missed before (and believe me, I miss a lot). Once the image is ready, I begin to add color. Still using the magic wand tool, I select an area on the image and add the base color using the paint bucket tool. The pencil tool helps when adding color to areas where the paint bucket might have missed, such as in between the lines of the bar-codes on his body. Since Psycho Mantis wears a lot of black, I learned that it's best to use several layers in order to add color to the outfit. I'll get to the reason for that later.
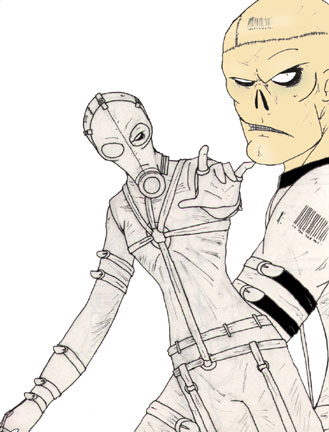
When the base color is set, it's time to add highlights to the skin and clothing. I used the airbrush tool with a very light pressure setting (5%) in order to give his skin that sickly look. Some brown in the skin to make shadows, and to give his skin that sickly, burned look. Some white highlights to give the illusion of light. I also added a little bit of gray around his eyes to give then a deeper set look as well. On the leather outfit, I used white to make the leather shine, and several shades of gray and black to give the appearance of wrinkles. This is where I learned the importance of layers as well. If you do all of the black coloring on one layer, it makes it difficult to select a single area, such as one belt or one part of the mask, with the magic wand tool, even if it's tolerance level is really low. I learned this the hard way, and it took a good amount of time to fix. But I think I worked my way around it pretty well.
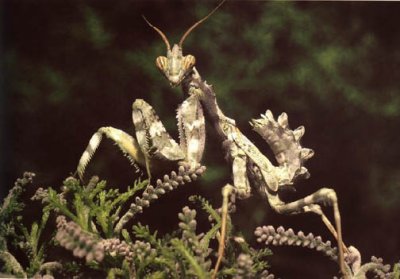
Now it was time to add the background. It seemed really dull without something there. So I decided to fill that big empty white spot with Psycho Mantis' namesake. By searching through books and the internet, I found myself a picture of the ugliest praying mantis possible. Rather than just stick that ugly mother of a bug in the background, I decided to play around with it. Using the image menu, I altered the image to a grayscale picture in order to ditch all of the color information, then I switched it back to RGB color. Using the filter menu, I chose Neon Glow from the artistic filters. That gave the mantis a sickening, radioactive green glow.
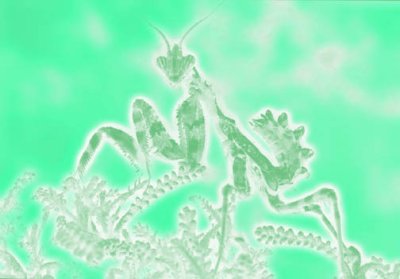
Now it's time to add it to the original picture. I increased the size of the mantis in order to make it work as a background, and copied the image. I then went back to the Psycho Mantis image and selected all the empty background areas with the magic wand tool. I then went to the edit menu, and choose the paste into option. I then moved the Mantis into proper position. After this was all completed, I flatten the image and decreased the size of the entire picture to a printable size. Now came the time to add the finishing touch: the text.
Using the text tool, I cycled through the all of the available fonts until I found two that while they contrast in style, both represent the character in their appearance. The thin, warped text used in the word "Psycho" fits the twisted nature of the character, and the bold text used in the word "Mantis" works because, after all, you would have to be pretty bold to delve into the minds of others. I used the layer effect "drop shadow" on each word, in order to give them a raised appearance, and the keep the two words from becoming unreadable as they overlap each other. After this was complete, and I was proud of the work, I flattened the image one final time, saved it as a .JPG file, and spread it out over the internet for everyone else to enjoy.
Well, there you have it. I hope you like the picture, and I hope my long winded lesson was helpful.
Text written by Jacob ''Carp'' Paul for GameArt.com