

GameArt Spotlight #73
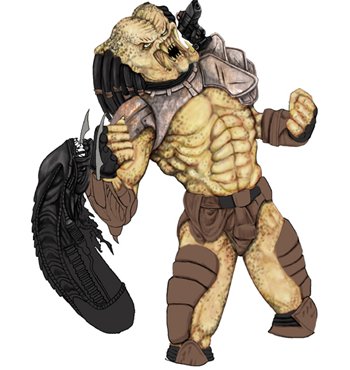
"Victory Cry" by Steve Goad
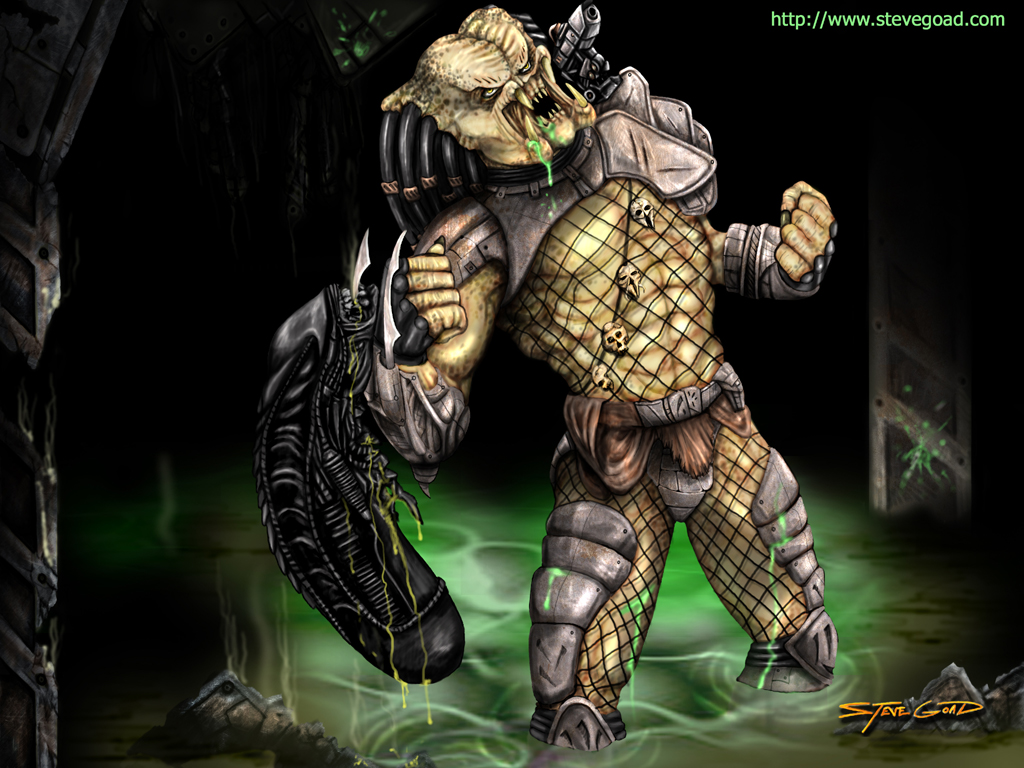
Image details
- Title: Victory Cry
- Gallery ID: 01000
- Artist name: Steve Goad
- Posting date: 2000-09-01 (a Friday)
- Artist website: http://www.stevegoad.com
- Tags: Alien, Vs, Predators, AVP, 1000, millenium, paintings, monsters, ufos, arnold, schwarzenegger, movis, films
- Image size: 29.96 KB
- Votes: 22
Please be sure to read the Copyright & Legal information text on the About & Help page.
Spotlight article
Victory Cry took me about a week to do, that's working on it a couple of hours a night after work. In a perfect world .."work" would be drawing the pic :) The first thing I usually do is create an idea or image in my head that I think would make for a good design. The second thing I do is start researching for resources, in this image I researched tons of Aliens vs Predator pages and sites based on the movie "Predator".
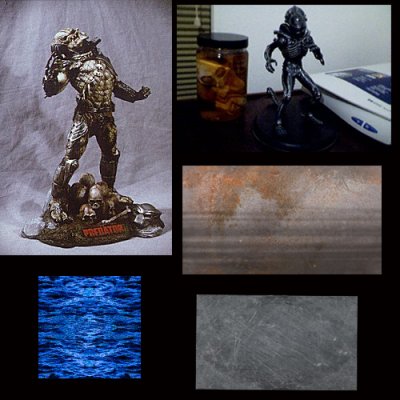
The pic that really caught my eye was this image of a statue Dark Horse comics created. His pose was awesome so I had to use it as a reference. As for the Alien... have a kit that I glued together and painted I used to reference. I also looked for water and rusted metal textures.
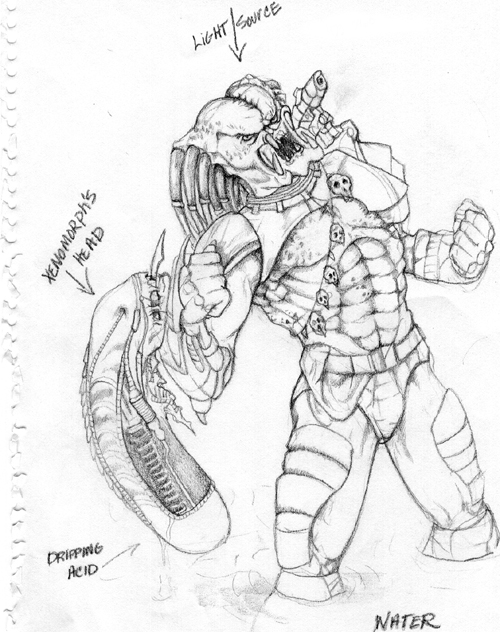
After I gather the resources I need I create the sketch, I don't know what it is about this part but I just don't like the way my sketches look and I usually correct a lot of stuff on the sketch after it's scanned so I try to make the sketch as basic as I can. When the image is scanned I create a new image in Photoshop 5.5 3072x2304 res at 400dpi with a white background. Then I copy and paste the scanned sketch into this new image and adjust it's size to where I think it's a good fit on the page. Next I create a new layer on top of the sketch and reduce the opacity on the sketch layer to 60%, what this does is make the sketch layer light enough for me to still see and draw on the top layer to trace so I can see my progress. Tracing the sketch is where I can make changes and make the lines more refined so it makes the color fill easy. I use the paintbrush tool to sketch.
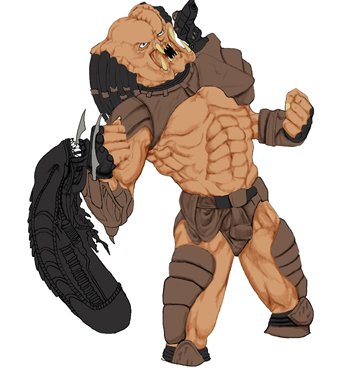
When I'm done tracing (funny...i feel weird saying trace, even when it's my own drawing. lol ) I start adding color with the paint bucket. I try to stay in the medium area..not too dark, not too light that way it allows me to add the lights and darks easier. When I start to add shading thetools I mainly use are dodge, burn, smudge and the airbrush. The key tododging,burning and airbrushing lie in the pressure and options settings (that's just my opinion) as i'm burning and dodging I'm constantly adjusting the pressure and I always use a very light pressure setting (30-50%) for best effects. I also find myself starting out with the burn first and as I'm working I'm hitting the alt key to switch back and forth from dodge and burn but at the same time I'm also switching the options from Highlights to Midtones to Shadows.
Once I have the basics down of shading I then use the smudge tool as a blending technique, I also adjust the Option of the smudge tool to darken and lighten...depending on where I'm at in drawing. (dark or light area) If i get in a rush (which I often do) and burn too much I'll use the airbrush to correct it, I use a light setting on the pressure for the airbrush as well. I'll keep repeating this step until I'm happy with the way it looks. Once the overall shading is done I'll start adding the detail (spots on the skin, scratches on the armor) I don't worry about the different colors until I have most of my detail. When I'm at the point where I want to add more coloring I mainly use the saturate tool and airbrush. For the Predator's skin the base color I started out with was brown, for my additional color I chose a light green since the predator had a tint of green in his skin. On the airbrush setting I select overlay, this allows all the detail that you just created on the base color to stay. As I'm brushing I'll lightly saturate the color in certain areas to give it that blemished skin look. Keep in mind I'm still on the same layer. Same goes for the metal texture on his armor...I started out with a grey base color then used a red overlay after I added the detail with dodging and burning. For the Alien, he was the easiest because he was just shades of grey and all I used was the dodge, burn and paintbrush with a small brush size to bring out the detail. (like the tubes and stuff coming out of his head). As for the water I used two different layers... bottom layer was the brown you see on the outsides and a really bright green for the top layer. I didn't have to do a thing for the bottom layer I used the highlight dodge setting to get the reflective streaks and the midtones burn setting for the darker green areas. After adding the detail on the top layer I reduced the opacity to 70% so the color wouldn't be so bright, plus you can see the brown coming through on the bottom when you do that. Then I merge the top layer with the bottom and use the smudge tool to blend in the rough edges. I usually don't work on each layer separately, I like working on all layers all at once...I add a little here and there on each layer.
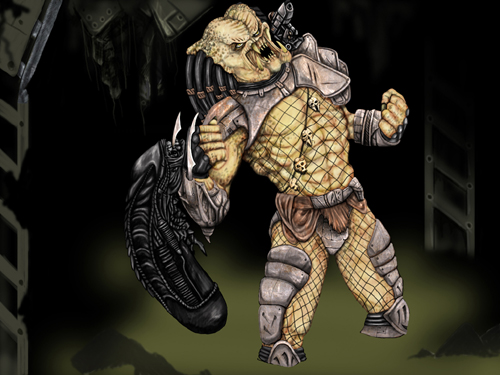
On top of the water layer I create a new one, this is where I drew the banged up metal beams for these I basically used the same technique... sketched,filled in with a solid color, used the burn, dodge and paintbrush for the detail, then added different coloring with the overlay airbrush and saturate. You can also use the rubber stamp to get texturing from the metal you've already created...that's what I did anyway. I grabbed the texturing I did on the predator's armor and smudged it in on the beams. For the jagged look on the metal beams and the scrap metal in the water since this was a separate layer..I used the eraser to knock out sections of the beams and make the edges jagged. I also use the eraser to clean up the outside edges on the predator and Alien Layer. Having multiple layers are always handy. At this point the scene is coming together but the Predator and Alien Layer look a little out place...looks too bright so I take the rendering filter and pick lighting effects and choose the light source so it blends the layer to it's surroundings. I wished I would've taken more progress shots but hopefully if I'm on the spotlight again I'll bring more with me. :) But that's basically how I work... in a nutshell... well I don't work in a nutshell.... well you know what I mean.
Text written by Steve Goad for GameArt.com