

GameArt Spotlight #83
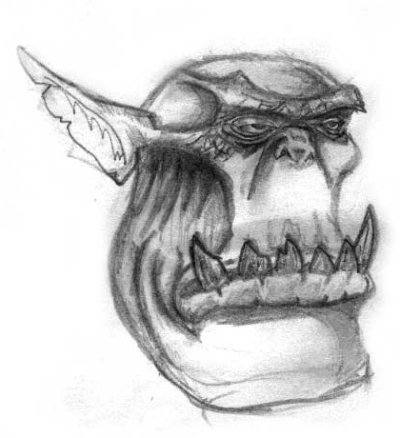
"Gloom" by Sameer Shetty

Image details
- Title: Gloom
- Gallery ID: 01038
- Artist name: Sameer Shetty
- Posting date: 2000-11-02 (a Thursday)
- Artist website: http://www.thaghetto.net
- Tags: warcraft, , warhammer, elfes, orcs, gnomes, ugly, faces, devils, monsters, paintings
- Image size: 20.36 KB
- Votes: 34
Please be sure to read the Copyright & Legal information text on the About & Help page.
Spotlight article
There is no hard table i stick to while makin a pic...i always wind up tryin out new methods and stuff, so dont stick to this! I usually like to sketch my work on paper rather than on the PC itself, its the feel of lead on paper or something. Well after u finish sketch in your pic on paper, scan it into the computer at a high resolution, depending on how detailed your sketch is. Remember not to go overboard in shading your drawing on paper, otherwise you'll have a problem cleaning it up ( like I always do =) ) So thus my sketch looks untidy.
After your sketch is in Photoshop or Paintshop(whichever u prefer) start cleaning it up....this I CANNOT do for peanuts, my pictures suffer heavily cuz i go overboard shading and i cant clean them up properly. But there a good tutorial on cleaning up sketches in this site .... somewhere! I usually just fiddle with the brightness/contrast a li'l before i sit with the eraser. Believe me you dont wanna do that After that u start to ink your sketch with the paintbucket or airbursh(sharp edged brush) wit the duplicate layer set to multiply. After your pic is all coloured up in its basic colours, you should have a very simple idea of how your pic is gonna turn out. Selcting the basic shades is important. It should not be either to dark nor too light.

First pinpoint your light sources. Set your Burn tool to Midtones and Dodge tool to Highlights. Start your shading off with the shadows of the pic first. I assume that you will have a basic understanding of lighting, if not there is a VERY VERY good tutorial on lighting at www.planetquake.com/pandemonium. It explains perfectly how light works.

Now you know how light works, after u have shaded the darker area of your pic, ten u can go on to the lighter areas. Dont go overboard with the dodge tool or the effect you will get will get glossy. If u make a mistake like goin overboard, and its too late to use the histroy menu, instead of using the opposite of the dodge/burn tool, use the airbrush on a very low intensity with the original color it was.
After you have all your basic shading done, smudge along the lines to remove all those cartoony lines that were there in your original pic. So now u have a basically shaded pic without those lines. Now its almost complete. Start on the details:
In this pic the details include the cracks on the brow, the teeth and those boils and scratches on the face with really didnt turn out as nicely as i wanted, but im a lazy person =) ....very lazy.The boils are done by makin a li'l circle with the dodge tool, and then surrounding with the burn tool. After all this , I like to enhance the mood li'l. With a large soft edged burn brush i lightly stroke area which are away from the point of view and other areas such as the area under the eyes. Put your stamp on it, DONE
Text written by Sameer Shetty for GameArt.com