

GameArt Spotlight #98
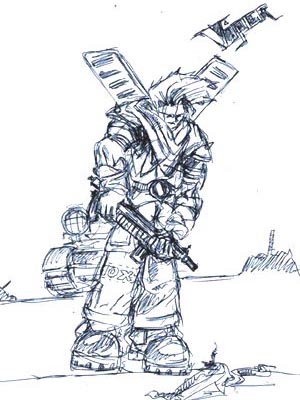
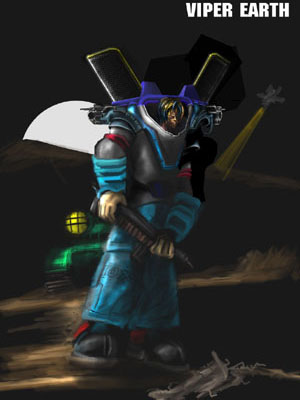
"Viper Earth 2002" by DSD-GINO

Image details
- Title: Viper Earth 2002
- Gallery ID: 01259
- Artist name: DSD-GINO
- Posting date: 2002-02-26 (a Tuesday)
- Artist website: http://www.dsd-gino.owns.it
- Tags: starcraft
- Image size: 13.44 KB
- Votes: 14
Please be sure to read the Copyright & Legal information text on the About & Help page.
Spotlight article
Welcome to the Viper Earth 2002 "Photoshop Tutorial",I will give an short introduction first, then we get in on with the killing. First of all .. just try to follow all the steps and take your time.. don't rush any steps otherwise you'l get screwed any ways.. doing work over again. Second thing.. you don't need to be an great artist to finnish this tutorial.. if you can find your way around in photoshop everything will be fine. Well enough of the chit chat let's get it on
Get a Black/White picture in Photoshop with the size you like.... I recommend sized up 800 px by 1200 px.
Option 1) Draw the image on paper.. scan it over to photoshop.. and use brightness/contrast option under the Image>Adjust menu in photoshop. Sharpen and brighten the image up untill it looks just fine.. *If the image isn't sharp enough alter it.. using the black brush on a opacity of 25% to 50% and ofcourse exact line size and alter the lines.. then manually add white where it's belong to be.
Option 2) Draw the image in Photoshop.. I suggest a Drawing Tablet for this.. but for the Tough Mouse fanatics.. Like was that should be no problem I guess.
Let's build up the layers..
Open up the layer panel "Window>Show Layers"
Duplicate the "Image Layer"
Add 2 new layers.. one to color image.. and fill the with the background color.
*Background color>choose a global background color.. for example mines was black because of space.. But if you are making someone in the air.. you abviouslyt choose a blue color.
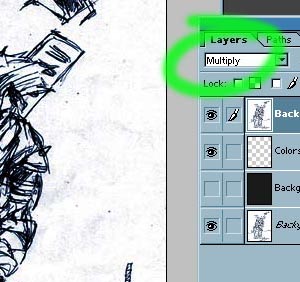
Look at the picture above.. And set your layers exact in the same order. Set teh top Layer to Mulitply, this will allow you to color below the black lines.. Put the Background Color Layer to invisible.. Just remove the eye in front of the layer..
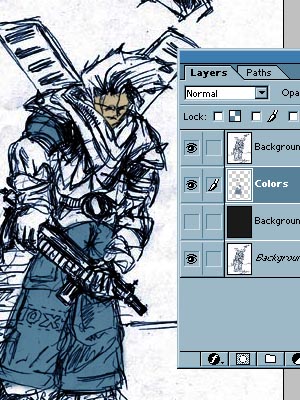
Start the Coloring..
Open up the Brush/Swatch/Color Panel Window>Show BrushesWindow>Show Swatches/Color
Select the Color Layer
Take a good look at the picture.. wich colors to use. Color everything solid.. forget air..clouds or smoke etc This is an important step choose good colors now.. and it will safe your ass later on. Do not spend hours coloring here..just pick the colors that you think will be the base colors for all the objects. For example.. if we got a Zebra.. we color him black and just a white stripes later on... try to see it in that perspective
Tip) Try to color quickly, and modify the opacity of the brush often while you color..
Start the Modifying
Open up the smudge tool Toolbar>Smudge tool
Flatten all layers.. For beginner.. who are not sure what's going to happen.. cut out the main Character/Object and place it in a separate layer. WEll start smudging like on the pic.. djust the smudge strength and give accent.. to corners.. smoothen colors out.. try to shape the whole object like you have it in mind..You can use the black lines for starting shadows etc.. just smudge them out carefully.
Tip) If you want to keep it in some sort of Anime Style.. be carefull with the black lines.. just adjust them.. but don't smudge em..
Coffee Break
If the whole picture is smudged it should look something like this.. not to fancy but who cares? Just take a good look to all the symmetry here.. now is the chance to adjust it! If you see any strange sizes..or the pose is wrong.. maybe you want to add/remove object..well do it
Take a 15 min coffy break, come back with your coffee and you will see a lot a mistakes.. well start adjusting.
Tip) If you are unhappy with colors.. just use the Hue/saturation tool here.. select the part that needs a color change and voila.
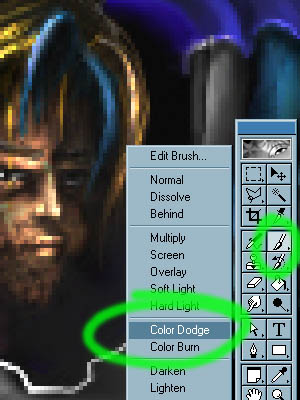
Get rid off teh coffee and let's get it on ZOoM in.. Pick the brush , right click on the picture and slect color dodge.. If you never used it.. try experimenting with it.. use the history to undo it.
Yup Colord D odge the Image.. High light and give life to it.. like you see on the right.
Use the black brush to define depth and light shadows .. try not to Color Burn burn to much..
Tip) If you want modify the pic.. you can always grab the smudge tool now.. who said you couldn't?
Defining the Detail..
ZOoM in. and ZoOm in... and Zoom in? Grab the Smallest brush there is and start defining details here... Combine this with Using the Color Dodge brush with A light color to light up the Detail..
Don't try to smudge here.. just keep it with drawing there are no filters for you here. Try to imagine all the stuff the smaler stuff.. like on the picture on the right.. Add little gaps and little wires.. etc.. all teh stuff that will make it complete.
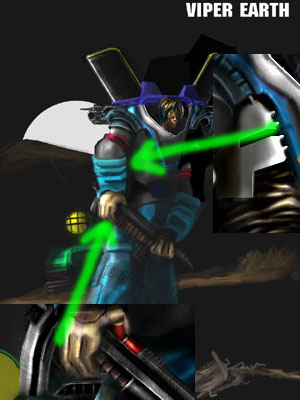
Just take reference from other materials( Like ot real pictures) zoom in .. and look at the structure.. ofcourse we don't steal it.. but we only look for reference.
Take a coffee break..
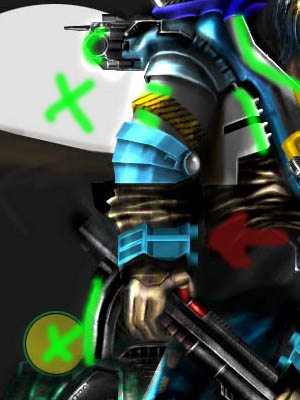
Define the light sources here.. I marked the sources that will shien light with a big X.. and I marked the materials that will reflect the most with an stripe..
There are many other sources of light falling in here... in this pic there are to much other.. but if you are making an daylight shot for example.. there could be hundreds.
The lightening will define also more detail.. so make sure where the light is coming from!
There are no tips here.If you are not sure.. about the lightening.. use acutal reference..
Enjoy the coffee.. again..
What I think is the hardest, but it takes the shortest time. Imagine how the light would fall in.. there are many ways to make the light..etc.. For the advanced users. try to brush teh lightening on the page to not uses selections.. For the beginners.. use selections with feather options.. to define light and do it in a new layer.
There's no tip here.. Just give all the sources of light there light,.. and draw reflections on the materials that reflect.. Also use reference from original photo's or what kind of art you are making.
Text written by DSD-GINO for GameArt.com